3. Basic Functions and Terminology
In this chapter we'll try to shed light on the most common functions of a mixer and clarify technical terms.
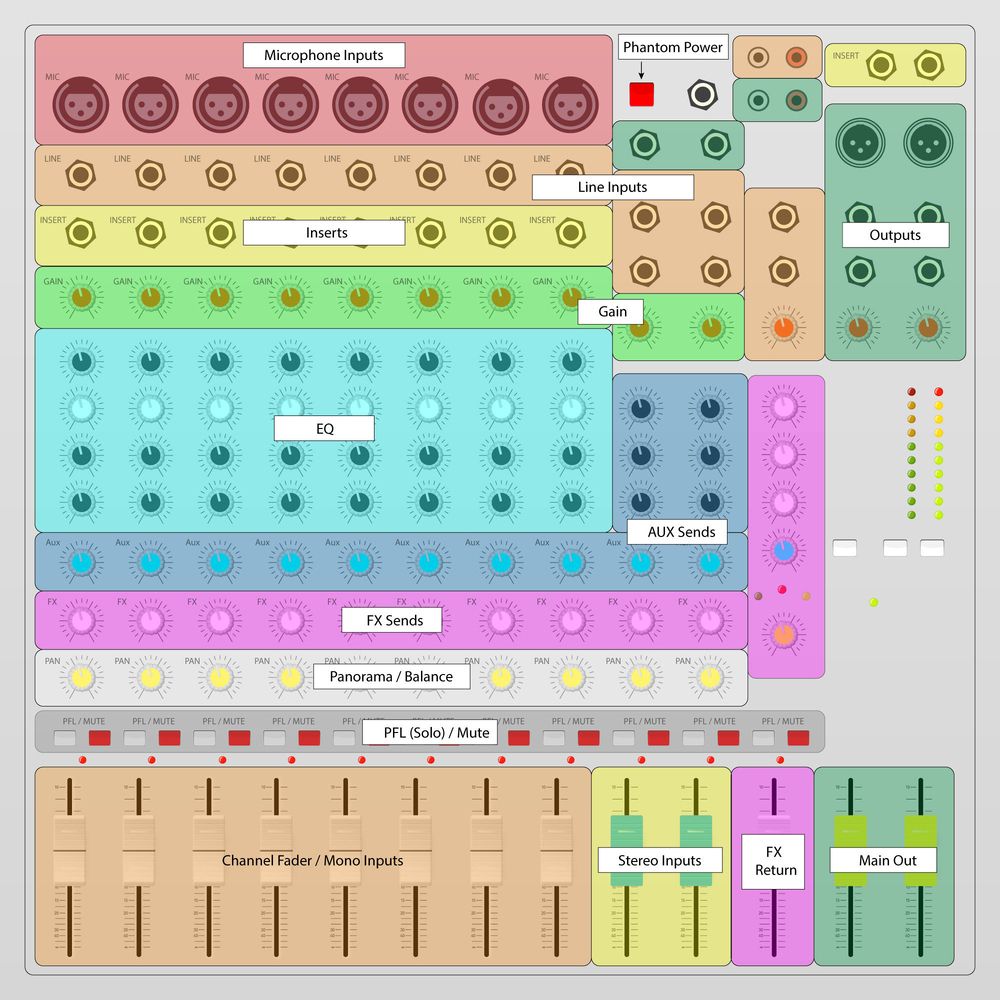
The following example covers the essentials:

The Most Important Functions of a Common Mixer
Mic Inputs:
This is where microphones or DI boxes are connected.
Microphones output a very low level and therefore need to be pre-amplified.
Dynamic microphones and passive DI boxes don’t need a power supply.
However, condenser microphones and active DI boxes do. Generally, this is provided via phantom power (+48V).
Line Inputs:
Line signals are "louder" than microphone signals. Thus, the Line Input is less sensitive than a microphone input. This is where devices like keyboards, CD players, and guitars are connected.
Hi-Z special input:
Instruments with active pre-amplification can easily be connected to a Line Input. Passive instruments deliver less output voltage. For this purpose, there's the Hi-Z input, which has higher input impedance and sensitivity.
Inserts:
An insert is a so-called "insert path". The socket serves not only as an output but also as an input. Here, external signal processors like compressors, gates, and EQs are connected. To connect these devices, you’ll need specific insert cables.
Gain:
Even when all instruments/devices are connected to their designated inputs, you might notice level differences. The singer might be quieter than the bassist, whose voice might be lower than the bass amp signal.
To balance these level differences before the actual mix, there’s the Gain knob.
EQ (Equalizer):
If the input signal doesn't sound perfect, you can rectify it using an EQ. If the voice lacks treble, you can add more highs. If the bass drum lacks punch, you can boost the bass EQ.
Basic EQs have two or three bands with fixed frequencies. More professional mixer EQs are often semi or fully parametric. Here, besides the Gain (the degree of amplification or attenuation), you can also adjust the center frequency and bandwidth of the filters to fine-tune the signal.
Aux Sends:
If you want your input signal not only audible to the audience but also, for instance, on a monitor speaker or in-ear headphones, you can send it to an auxiliary path. Using the knob in the channel strip (AUX SEND), you define the level it should be sent to the output. Then, the monitor or headphone amplifier is connected to the corresponding output socket.
In a monitor application, the Send is usually PRE-FADER defined. This means the volume on the monitor is independent of the main speakers. If the voice is made quieter for the audience, it remains unchanged on the monitor.
FX (Effects):
If the voice sounds "dry", you can add an effect (like reverb or delay). Many mixers have built-in effect devices. With the FX knob per channel (FX SEND), you decide whether and to what extent the input signal should be sent to the effect device. With the FX RETURN, you control how much effect should be mixed into the overall signal. Within the effect section itself, you can choose which effect to use. Moreover, with some mixers, you can change various parameters of the effect.
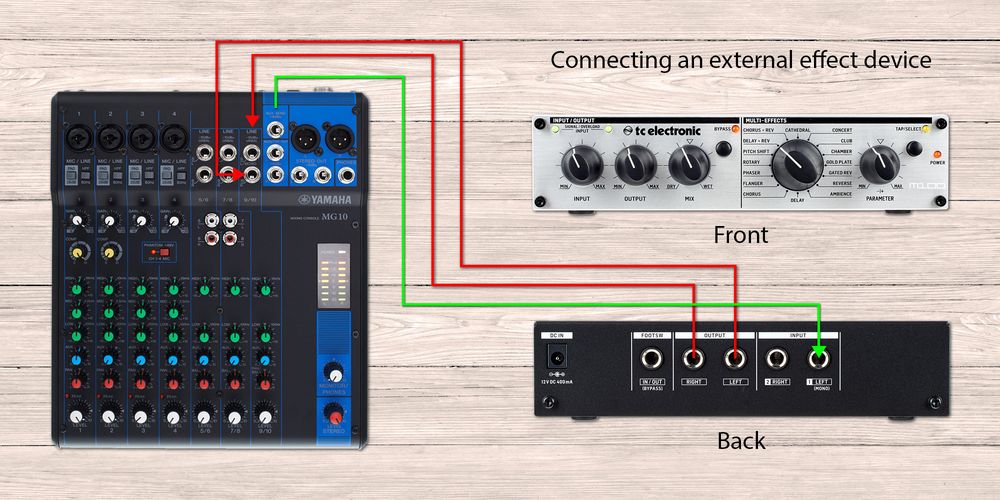
The principle remains the same for integrating an external effect device. Here, the FX Send output socket needs to be connected to the input of the effect device, and its output to a free channel on the mixer. This becomes the FX Return.
The bus should be defined as FX Send POST FADER in an application, thus, depending on the volume of the main speakers. When the voice is made quieter, less signal reaches the effect device. Therefore, the ratio of "dry" and effect signal always remains the same.

Connecting an external effect device
Pan/Balance:
With this knob, you decide where the input signal should be positioned in the stereo image. If turned completely to the left, the signal is only heard from the left, and the same when turned to the right. In the center position (12 o'clock), it comes equally from both outputs.
Mute:
Activating this will mute the channel.
PFL (Solo):
During gain adjustment (balancing the levels with the Gain), the Solo function of the mixer helps. The input signal is sent directly (without depending on the channel's fader position) to the headphone output. Hence the name PRE FADER LISTENING (PFL). Additionally, the input signal of the channel where the SOLO function is activated is visualized on the level meter.
Channel Faders:
You regulate how "loud" the channel should be with the faders per channel. Microphones, DI boxes, guitars, etc., are connected to mono inputs. Stereo signals consist of left and right signals. Devices like keyboards and players (like a phone, CD/MP3 player, etc.) are connected to stereo inputs. Here, both signals are practically controlled with a single fader.
Outputs:
Besides the main output (also called MAIN OUT or MASTER), a mixer usually has other outputs. Apart from the mentioned sends for stage monitors or effects, there's often a CONTROL ROOM or MONITOR OUT for speakers at the FOH or the secondary studio monitoring. Additionally, there's often a RECORD OUT where a recording device can be connected. Both outputs carry the same signal as the Master. In the case of the Control Room output, the volume can usually be controlled separately, not with Record Out.
Subgroups:
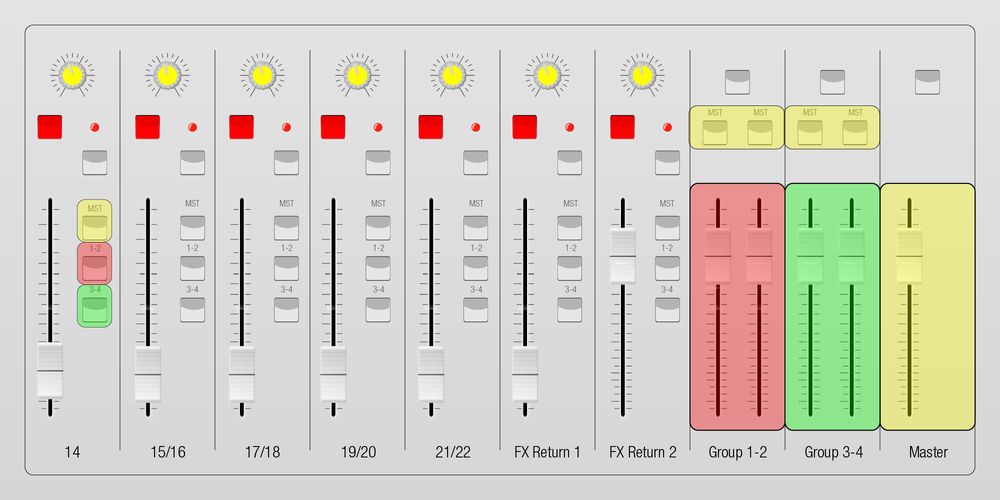
With a considerable number of channels, it can be difficult to keep track of all signals. Here, it makes sense to be able to control multiple signals together (e.g., all drum microphones, all background vocals, all brass instruments, etc.). This is done through subgroups. At some consoles, individual input signals can be routed to groups by pressing a button. Here's an example:

MST: The signal is sent to the Master
1-2: The signal is sent to Subgroups 1 and 2
3-4: The signal is sent to Subgroups 3 and 4


